

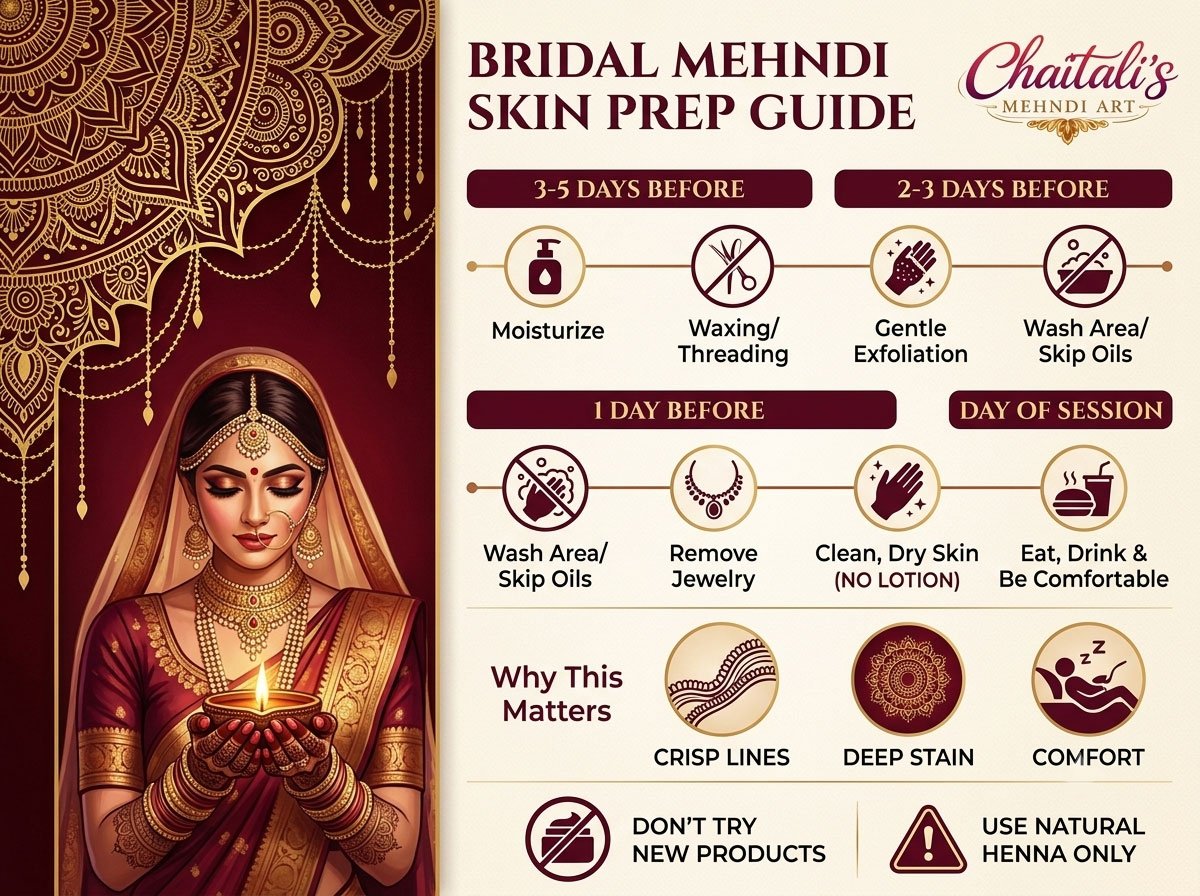
Your mehndi design is chosen, your artist is booked and your outfit is ready. There’s one more thing that quietly shapes how your mehndi turns out: the condition of your skin on the day.
Skin preparation affects how smoothly the henna goes on, how crisp the fine lines look and how deep and lasting the stain becomes. At Chaitali’s Mehndi Art, we often tell brides that the best preparation is simple and starts a few days before the appointment. In this guide, you’ll learn what to do and what to avoid, along with a day-by-day plan you can follow.
Why Skin Preparation Matters for Bridal Mehndi
Henna stains the top layers of your skin. That means the result depends partly on the paste and the artist’s skill, and partly on the surface it’s applied to. Well-prepared skin generally offers:
- Cleaner lines: Smooth, clean skin lets the cone glide, which helps with detailed work such as fine jaal patterns and fingertips.
- Better paste contact: Oil, lotion or product residue can form a barrier between the paste and your skin.
- A more even stain: Dry patches, rough areas and leftover products can cause patchy colour.
- A more comfortable session: Calm, healthy skin makes sitting for several hours easier.
Skin type and body temperature also affect stain colour, so no one can promise identical results for everyone. But preparation improves your chances of a rich, even finish.
Start 3–5 Days Before: Gentle Prep, Not Harsh Treatments
You don’t need an elaborate routine. In the days before your appointment, aim to keep your hands, arms, feet and legs healthy and calm.
1. Moisturise Regularly (But Not on the Day)
Dry, cracked skin can absorb paste unevenly and can feel uncomfortable under henna. In the days before mehndi, apply a plain, fragrance-free moisturiser to your hands, forearms and feet, especially at night.
Important: stop moisturising the area on the morning of your session. Creams and oils left on the skin can stop the paste from adhering properly.
2. Exfoliate Gently, 2–3 Days Before
Light exfoliation removes dead skin cells and helps the stain sit evenly. A soft scrub or a gentle washcloth is enough. Don’t scrub hard, and don’t exfoliate on the day itself, because irritated skin is more likely to sting under henna.
If your skin is sensitive, easily irritated or has a rash, skip exfoliation and speak to your artist and a doctor if needed.
3. Handle Waxing and Threading Early
If you plan to wax or thread arms, hands or legs before the wedding, do it at least 2–3 days before mehndi, not on the same day. Freshly waxed skin can be red and sensitive, and applying henna to it can cause discomfort. Give your skin time to settle.
4. Avoid Harsh Treatments and New Products
Wedding season tempts brides to try facials, peels, bleaches and new skincare products. Try to avoid new or harsh treatments on the areas that will be decorated, especially in the last few days. A reaction before a wedding is a stress you don’t need. If you’re using any medicated or prescribed skin product, ask your doctor before your session.
5. Look After Your Nails and Cuticles
Have manicures and pedicures done a few days before, not on the day. Nail polish or fresh gel applications can interfere with the design around the nails, and the wet work of a manicure can leave skin soft. Nails are usually best left clean and bare or with light, dry polish, so ask your artist what they prefer.
The Day Before: Simple Steps
1. Wash the Area Well
Wash your hands, arms and feet with mild soap and water and dry them thoroughly. Remove any leftover creams, sunscreen, self-tanner or perfume from the area.
2. Skip Heavy Oils and Fragrances
Avoid body oils, thick lotions and strongly scented products on the area to be decorated. If your skin feels very dry, use a light moisturiser earlier in the day, and leave the skin clean before bed.
3. Remove Rings and Bangles
Take off jewellery before the session. Rings can trap paste and interfere with designs on the fingers, and bangles can smudge work on the wrists and forearms. Ask your artist if a piece needs to stay on.
4. Plan Your Timing
Mehndi can take several hours. Decide when you’ll eat, when you’ll rest and who will help you afterwards. If you’re planning around your ceremony schedule, our guide to same-day mehndi booking in Ahmedabad explains what’s realistic when time is tight.
On the Day of Your Bridal Mehndi Session
1. Arrive with Clean, Dry Skin
Wash your hands and feet before arriving, and don’t apply lotion, sunscreen or oil to the area. Bring a thin wrap or shawl in case you get cold, because low body temperature can affect comfort.
2. Eat and Drink Before You Start
You’ll be sitting still for a long time and won’t be able to use your hands freely. Eat a proper meal and drink water first, and have a plan for how you’ll eat or drink during the session (a helper or a straw can help).
3. Wear Comfortable Clothes
Pick a loose top with sleeves that can be pushed up easily, or a sleeveless one, and avoid tight cuffs that could smudge the design. Wear or bring footwear that you can slip on and off, especially if feet are being decorated.
4. Use the Bathroom Beforehand
It sounds obvious, but a long session with wet paste is easier if you’ve planned your breaks. Tell your artist if you need a pause.
5. Tell Your Artist About Your Skin
Let your artist know if you have sensitive skin, a history of reactions to henna or other products, or any cuts or rashes on the area. It helps them adjust the plan, and you should also seek medical advice for anything that worries you.
Patch Test: A Small Step That Can Prevent Big Problems
If you have sensitive skin or have never used henna before, ask about a small patch test a few days before the wedding. This is a simple way to check for a reaction while there’s still time to adjust your plans.
Two important safety points:
- Natural henna only. Real henna is a greenish-brown paste that leaves an orange to brown stain. Avoid anything sold as “black henna” or “instant dark henna”. These products can contain harmful chemicals and may cause serious skin reactions. If someone offers you a very fast, jet-black result, that’s a warning sign.
- Ask what’s in the cone. A trustworthy artist will tell you the ingredients. If you’re unsure, ask before the session and not after.
If you notice burning, blistering or severe itching at any point, wash the paste off and seek medical advice.
What to Avoid Before Mehndi: Quick List
- Applying lotion, oil or sunscreen on the day
- Waxing, threading or shaving on the same day
- Trying new skincare products or treatments in the last few days
- Hard scrubbing or exfoliating right before the appointment
- Fresh manicures or wet nail work on the day
- Using strong perfumes or sprays on the area
- Skipping meals and water
After the Session: Protect the Work You Prepared For
Preparation helps the stain, and aftercare protects it. Here are the basics your artist will likely explain:
- Keep the paste on as long as you can. Many artists recommend several hours. Follow your artist’s specific advice.
- Seal gently if advised. A light lemon-sugar mix dabbed on dried paste is a common method to help the paste cling. Ask your artist first.
- Avoid water at first. When removing the paste, scrape or rub it off instead of washing it away, and avoid water on the design for the first several hours.
- Keep your hands warm. Warmth is often said to help the stain develop.
- Expect colour to deepen. The stain usually starts orange and darkens over a day or two.
- Moisturise gently after a day or so. This can help keep skin comfortable while the stain fades naturally.
For a fuller explanation, look through our mehndi aftercare tips.
A Simple 5-Day Skin Prep Plan
| Timing | What to do |
|---|---|
| 5 days before | Start moisturising hands, arms and feet daily. Avoid trying new products. |
| 3–4 days before | Finish waxing, threading and manicures/pedicures. |
| 2–3 days before | Gentle exfoliation, if your skin tolerates it. Patch test if needed. |
| 1 day before | Wash the area, stop heavy oils and remove jewellery ready for the session. |
| Day of | Clean, dry skin with no lotion or oil. Eat, drink and dress comfortably. |
Preparation Tips by Design Style
Different designs put different demands on your skin and your schedule:
- Fine, detailed bridal work: Clean, smooth skin matters most for intricate patterns. See our bridal mehndi services for what’s involved.
- Bold Arabic designs: Flowing lines and open spaces suit skin that is clean and lightly hydrated. Read our guide to Arabic mehndi designs for brides.
- Engagement and sangeet: These events often have tight timelines, so plan your prep early. See Mehndi Designs for Engagement Ceremonies and Sangeet Night Mehndi Designs for the Bride.
- Pre-wedding shoots: Photos show skin closely, so prep and timing matter. Read Pre-Wedding Shoot Mehndi: What Brides Should Know.
Common Mistakes Brides Make
- Moisturising heavily right before the session. It can stop paste from sticking.
- Waxing on the same day. The skin can be sore and red.
- Trying a new facial or product close to the wedding. Save experiments for after.
- Skipping the patch test with sensitive skin. A few minutes of caution is worth it.
- Rushing the timeline. A stressed, hurried session isn’t comfortable for anyone.
- Choosing an artist on price alone. Ask about ingredients, timing and experience. Read why brides recommend Chaitali’s Mehndi Art if you’re comparing.
Frequently Asked Questions
1. Should I moisturise before mehndi?
Yes, in the days before, to keep skin healthy. Avoid applying moisturiser, oil or lotion on the day of the session, because it can block the paste from sticking.
2. Can I wax or thread before bridal mehndi?
Yes, but do it at least 2–3 days before so skin can settle. Avoid doing it on the day itself.
3. Should I exfoliate before mehndi?
Gentle exfoliation 2–3 days beforehand can help. Avoid harsh scrubbing, and skip it if your skin is sensitive or irritated.
4. Can I wear nail polish for mehndi?
Ask your artist. Many prefer clean nails or light, fully dry polish, especially if the design covers the fingertips.
5. How far ahead of the wedding should I get mehndi done?
Many brides book one to two days before the wedding so the stain can deepen. Your artist can suggest a schedule that fits your ceremonies.
6. Is black henna safe?
No. Products sold as “black henna” can contain harmful chemicals. Choose natural henna and ask about the ingredients.
Final Thoughts
Preparing your skin for bridal mehndi isn’t complicated: keep it clean, healthy and free of oils on the day, avoid new treatments and plan your timing. With good preparation and a skilled artist, you give your design the best chance of turning out crisp, dark and long-lasting.
Planning your bridal mehndi in Ahmedabad? Chaitali’s Mehndi Art would be glad to help you plan your design and schedule. Contact us to check availability, or browse more tips on our mehndi blog.